If your computer does not have wireless network support built in, plug your network adapter into your USB port, and place the antenna on top of your computer (in the case of a desktop computer), or insert the network adapter into an empty PC card slot (in the case of a laptop). Windows XP will automatically detect the new adapter, and may prompt you to insert the CD that came with your adapter. The on-screen instructions will guide you through the configuration process.
Note: The steps below only apply if you're using Windows XP Service Pack 2. If you're running Windows XP and you don't have Service Pack 2 yet, plug your computer into your wireless router and download and install Windows XP Service Pack 2.
Windows XP should show an icon with a notification that says it has found a wireless network.

Follow these steps to connect your computer to your wireless network:
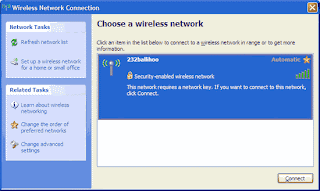
1.Right-click the wireless network icon in the lower-right corner of your screen, and then click View Available Wireless Networks. If you run into any problems, consult the documentation that came with your network adapter. Don't be afraid to call their tech support.
2.The Wireless Network Connection window should appear and you should see your wireless network listed with the network name you chose. If you don't see your network, click Refresh network list in the upper-left corner. Click your network, and then click Connect in the lower-right corner.

3.Windows XP prompts you to enter a key. Type the encryption key that you wrote down earlier in both the Network key and Confirm network key boxes, and then click Connect.
4.Windows XP will show its progress as it connects to your network. After you're connected, you can now close the Wireless Network Connection window. You're done.
Note: If the Wireless Network Connection window continues to show Acquiring Network Address, you may have mistyped the encryption key.
No comments:
Post a Comment