Saturday, October 27, 2007

Connect your computers

Connect your computers

If your computer does not have wireless network support built in, plug your network adapter into your USB port, and place the antenna on top of your computer (in the case of a desktop computer), or insert the network adapter into an empty PC card slot (in the case of a laptop). Windows XP will automatically detect the new adapter, and may prompt you to insert the CD that came with your adapter. The on-screen instructions will guide you through the configuration process.


Note: The steps below only apply if you're using Windows XP Service Pack 2. If you're running Windows XP and you don't have Service Pack 2 yet, plug your computer into your wireless router and download and install Windows XP Service Pack 2.


Windows XP should show an icon with a notification that says it has found a wireless network.


Follow these steps to connect your computer to your wireless network:

1.Right-click the wireless network icon in the lower-right corner of your screen, and then click View Available Wireless Networks. If you run into any problems, consult the documentation that came with your network adapter. Don't be afraid to call their tech support.


2.The Wireless Network Connection window should appear and you should see your wireless network listed with the network name you chose. If you don't see your network, click Refresh network list in the upper-left corner. Click your network, and then click Connect in the lower-right corner.


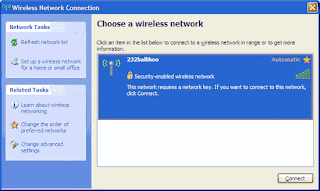
3.Windows XP prompts you to enter a key. Type the encryption key that you wrote down earlier in both the Network key and Confirm network key boxes, and then click Connect.

4.Windows XP will show its progress as it connects to your network. After you're connected, you can now close the Wireless Network Connection window. You're done.

Note: If the Wireless Network Connection window continues to show Acquiring Network Address, you may have mistyped the encryption key.

Configure your wireless router

Configure your wireless router


Using the network cable that came with your wireless router, you should temporarily connect your computer to one of the open network ports on your wireless router (any port that isn't labeled Internet, WAN, or WLAN). If you need to, turn your computer on. It should automatically connect to your router.
Next, open Internet Explorer and type in the address to configure your router.
You might be prompted for a password. The address and password you use will vary depending on what type of router you have, so refer to the instructions included with your router.
As a quick reference, this table shows the default addresses, usernames, and passwords for some common router manufacturers.

Router Address Username Password
.................................................................................................

3Com http://192.168.1.1 admin admin

D-Link http://192.168.0.1 admin -----

Linksys http://192.168.1.1 admin admin

Microsoft Broadband http://192.168.2.1 admin admin

Netgear http://192.168.0.1 admin password
.....................................................................................................
Internet Explorer will show your router's configuration page. Most of the default settings should be fine, but you should configure three things:
1.
Your wireless network name, known as the SSID. This name identifies your network. You should choose something unique that none of your neighbors will be using.
2.
Wireless encryption (WEP) or Wi-Fi Protected Access (WPA), which help protect your wireless network. For most routers, you will provide a passphrase that your router uses to generate several keys. Make sure your passphrase is unique and long (you don't need to memorize it).
3.
Your administrative password, which controls your wireless network. Just like any other password, it should not be a word that you can find in the dictionary, and it should be a combination of letters, numbers, and symbols. Be sure you can remember this password, because you'll need it if you ever have to change your router's settings.
The exact steps you follow to configure these settings will vary depending on the type of router you have. After each configuration setting, be sure to click Save Settings, Apply, or OK to save your changes.
Now, you should disconnect the network cable from your computer.

Connect your wireless router


Connect your wireless router

Since you'll be temporarily disconnected from the Internet, print these instructions before you go any further.
First, locate your cable modem or DSL modem and unplug it to turn it off.
Next, connect your wireless router to your modem. Your modem should stay connected directly to the Internet. Later, after you've hooked everything up, your computer will wirelessly connect to your router, and the router will send communications through your modem to the Internet.


Next, connect your router to your modem:
Note: The instructions below apply to a Linksys wireless router. The ports on your router may be labeled differently, and the images may look different on your router. Check the documentation that came with your equipment for additional assistance.

If you currently have your computer connected directly to your modem: Unplug the network cable from the back of your computer, and plug it into the port labeled Internet, WAN, or WLAN on the back of your router.

If you do not currently have a computer connected to the Internet: Plug one end of a network cable (included with your router) into your modem, and plug the other end of the network cable into the Internet, WAN, or WLAN port on your wireless router.

If you currently have your computer connected to a router: Unplug the network cable connected to the Internet, WAN, or WLAN port from your current router, and plug this end of the cable into the Internet, WAN, or WLAN port on your wireless router. Then, unplug any other network cables, and plug them into the available ports on your wireless router. You no longer need your original router, because your new wireless router replaces it.


Next, plug in and turn on your cable or DSL modem. Wait a few minutes to give it time to connect to the Internet, and then plug in and turn on your wireless router. After a minute, the Internet, WAN, or WLAN light on your wireless router should light up, indicating that it has successfully connected to your modem.

Choose your wireless equipment


Choose your wireless equipment
The first step is to make sure that you have the equipment you need. As you're looking for products in stores or on the Internet, you might notice that you can choose equipment that supports three different wireless networking technologies: 802.11a, 802.11b, and 802.11g. We recommend 802.11g, because it offers excellent performance and is compatible with almost everything.
Shopping list

Broadband Internet connection

Wireless router

.A computer with built-in wireless networking support or a wireless network adapter

A wireless router
The router converts the signals coming across your Internet connection into a wireless broadcast, sort of like a cordless phone base station. Be sure to get a wireless router, and not a wireless access point.
A wireless network adapter
Network adapters wirelessly connect your computer to your wireless router. If you have a newer computer you may already have wireless capabilities built in. If this is the case, then you will not need a wireless network adapter. If you need to purchase an adapter for a desktop computer, buy a USB wireless network adapter. If you have a laptop, buy a PC card-based network adapter. Make sure that you have one adapter for every computer on your network.
Note: To make setup easy, choose a network adapter made by the same vendor that made your wireless router. For example, if you find a good price on a Linksys router, choose a Linksys network adapter to go with it. To make shopping even easier, buy a bundle, such as those available from D-Link, Netgear, Linksys, Microsoft, and Buffalo. If you have a desktop computer, make sure that you have an available USB port to plug the wireless network adapter into. If you don't have any open USB ports, buy a hub to add additional ports.

Home wireless network

4 steps to set up your home wireless network

You can use a wireless network to share Internet access, files, printers, and more. Or you can use it to surf the Web while you're sitting on your couch or in your yard. Plus, it's easier to install than you think.
There are 4 steps to creating a wireless network:
1.
Choose your wireless equipment
2.
Connect your wireless router
3.
Configure your wireless router
4.
Connect your computers
For Windows XP users, Windows XP Service Pack 2 is not required for wireless networking, but it does make things much easier. Service Pack 2 also helps protect you against hackers, worms, and other Internet intruders.

Tuesday, October 23, 2007

Ace Password Sniffer


Capture passwords through http, ftp, smtp, pop3, telnet.

The most powerful password sniffer and password monitoring utility. Ace Password Sniffer can listen on your LAN and enables network administrators or parents to capture passwords of any network user. Currently Ace Password Sniffer can monitor and capture passwords through FTP, POP3, HTTP, SMTP,
Telnet, and etc.
Ace Password Sniffer works passively and don't generate any network traffic, therefore, it is very hard to be detected by others. And you needn't install any additional software on the target PCs or workstations. If your network is connected through switch, you can run the sniffer on the gateway or proxy server, which can get all network traffic.

This stealth-monitoring utility is useful to recover your network passwords, to receive network passwords of children for parents, and to monitor passwords abuse for server administrators.
Free Download


Features

01.Efficient
You can see the passwords as soon as it appeared on LAN.

02.Support Various Protocols

Fully support application protocols of FTP, SMTP, POP3, TELNET, etc. That means user names and passwords used to send and receive emails, to log on a web site, or to log on a server, can be fully captured and saved.

03.Support HTTP Protocol

Support HTTP protocol, including proxy password, basic http authenticate authoriation and most passwords submitted through HTML, no matter they are encoded by MIME or base64.

04.Verify whether the captured passwords are valid

It can tell whether the passwords captured are right. You can even get the replies from the server for the login. And it always keeps trying to get valid user name and password pairs.

Who use it?
01.Network Administrators
Monitor passwords abuse.
02.Parents
Monitoring your kids email and web activities.
03.Common User
Recover your network passwords.


Friday, October 5, 2007

Free Video Editing Software for Producing Movies & Vlogs


Ferrari fan, Prabhu Krishnamurthy, is on a hunt for some free movie making software. He writes:
We are coming up with a 12 minute movie for culturals. Do you know any good movie making software, that can be downloaded for free?

Our movie will be based on a news channel. So I am looking at a video editor/movie maker software that allows scrolling texts, subtitles and custom animations etc.
You want so many video editing features for free ? Well, it may be possible as here are some good options for editing that don't cost a dime.

But before you read this list, check the CDs that shipped with your handycam - most camera manufacturers like Sony, Canon and Panasonic generally provide a decent video editing software with the camera. OK, back to the list of free video editing software:

Windows Movie Maker - The best video editing tool for Windows that's absolutely free and chances are you already have it installed on your computer as part of XP SP2. Microsoft Movie Maker has all the basic video editing tools plus a good collection of transitions and video effects.

There's an in-built movie titler that lets add you styles to text titles including ticker taps, zoom and even the scroll effect. And if you are feeling lazy, just hit the AutoMovie command to have the entire video produced for you with intervention.

Avid Free DV - Avid Free DV, poor cousin of Avid Xpress Pro, has all the basic video and audio editing features and allow you to put video in two tracks simultaneously. They have an extensive collection of tutorials online to help you get started quickly.

Support both Mac OS and Windows XP platform. Infact, you can even play with keyframes for generating custom moves and transitions. Ships with the Avid Title tool.

JahShaka - An open source video editing software that is currently in Alpha stage but has features found only in expensive video editing software suites.

Works on Mac, Linux and Windows. The interface might take some time for you to get started otherwise the software is definitely the most powerful one out there. And the price is just right. $0. Also does 3D effects which you won't find in other free video editors.

Jumpcut.com - Jumpcut is a web based video editing software and now it's even part of the Yahoo! family. You upload a video or small clips just like importing inside a desktop software.

There are dozens of transitions and special effects. You can import photographs from your Flickr or Facebook account to mix them with the videos. The jumpcut editor is intuitive enough and there is good title support as well. And your movies are published online automatically. Perfect for quick vlogging and video podcasting.

Finally... While the above video editing software should satisfy the needs of most home movie makers, you can probably consider Adobe Premiere Elements or even Muvee AutoProducer for more features and better control over the final output. They have trial version to help you try out the software before actually buying it.

Extract Still Photographs from Wedding DVD Videos for Printing


extract photo from dvd videoThere are tons of software for creating a slideshow DVD movie of your photographs but DI reader Pedro Almeida from Lisbon has a reverse requirement. He wants to extract still pictures from his Wedding video DVD for printing.
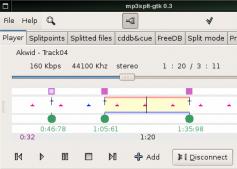
The professional wedding photographer who produced the photo DVD has the source images but he's probably charging lot of money for the service. Pedro writes:
The Wedding DVD was sold to me by a photographer and has cost me a great deal of money.

One of the DVD menu choices is to view all the wedding photos as a slideshow presentation. The photographer will take an additional charge of 3,5 euros for printing each photo.

Can we split this DVD photos presentation into separate image files like GIF or JPG. Then I will be able to print the photos myself and it would just cost me 0,5 euros each photo!!
Pedro, there are two solutions to your problem as explained here:

Solution A: - Play the DVD movie inside a media player and capture the scenes (or video frames) that you would like to print. A word of caution - normal screen capture commands like Print Screen won't work with capturing DVD videos and all you will get is a blank screen.

Read our previous guide on on how to screen capture scenes from DVD movies.

Solution B: - The second solution involves ripping the slideshow DVD into AVI or WMV files and then using a video extractor software to convert that ripped video into still photographs.

Use a DVD backup software like DVDx to convert your Wedding DVD vob files into AVI format. Then download AVCutty to extract picture frames from this AVI video.

AVCutty is smart and can automatically detect the scene changes in video files. Open the extracted photographs in an software like Picasa and select the ones that you like to print. Burn them onto a CD from Picasa and just walk into your nearest photo printing shop.

And yes, all the software mentioned above are absolutely free. The quality of extracted images may not match that of original pictures but they would still be good enough.

MP3 Cutters: Split MP3 Files Into Multiple Audio Tracks and Vice-Versa


DI Reader Ashish Gupta has an interesting question - "Do you have any easy to use freeware to split mp3 file into smaller mp3 (at user defined points)? I know Virtual Dub that does same to video files."

MP3 Splitter utilities let you easily trim the not-so-interesting portions of a podcast show, music recording or even a CD song. This reduces the file size and your friends won't get bored as they get to listen only the relevant parts of the audio clip.

While there are tons of free and commercial MP3 Trimming software, the most popular ones are MP3Splt and MP3DirectCut - both are free and keep the music quality intact as they directly in the MP3 format without having to decode/re-encode.

Command Line Utility for Splitting MP3 files

MP3Splt is a free but amazing command-line utility that can split mp3 and ogg files from a begin time to an end time. MP3Splt can even detect silent points in your audio clip and split the track accordingly.

mp3splt -t 10.00 album.mp3 [Split album.mp3 in many equal-sized parts of 10 minutes each.]

mp3splt album.mp3 10.12 14.25 -o out.mp3 [Split album.mp3 starting at 10min 12sec, ending at 14mins 25sec and save the mp3 slice in a new file called out.mp3]

Mp3Splt is available for Mac, Windows, DOS and Linux platforms. [Download]

GUI Based MP3 Splitter Software

MP3DirectCut is Windows based audio editor that also supports splitting of Audio CDs into smaller MP3 files. You can visually select and divide portions of mp3 files or use the command line.

The audio quality is preserved as the editing is done directly on the MP3 file without conversion to other formats. Can also be used to join mp3 file without re-encoding. Tiny footprint and does the job exceptionally well. [Download]

Advanced MP3 Splitting

While the above two utilities should satisfy most of your needs, if you are looking for that extra power, download Audacity with Lame MP3 encoder. It's free and has tons of advanced audio editing features with visual waveforms, sound effects and more.

Rip Audio from YouTube Music Videos

Youtube Music Videos on iPod
DI reader Russell Tully is trying to record and save the audio from Youtube videos but without any success. Russ writes:
There are some rare music videos on 'youtube'. I very much want just the sound from these videos, but I've tried a number of different audio capture programs and I just can't seem to get any working - problem with sound card probably.

Surely there is a program that would allow me to record and save the audio from a flash video stream and record it to my HHD. I can't seem to use my sound card for the job. Is there any other way?
Russ, you can easily save the Youtube Videos as MP3 files. Here's how:

Directly from Youtube - The FLV Online Converter at Vixy.net can take Youtube Video URLs and provide you an MP3 audio file of the YouTube video

Extract Audio from FLV files - If the Youtube Video is on your hard-disk as an FLV video file, try the free FLV Extract utility that extracts video and audio from FLV files. The video is saved to .avi and the audio is saved to MP3.

The above trick can be applied to any video sharing website like MetaCafe, DailyMotion or Google Video.

Monday, October 1, 2007

Transfer PowerPoint Presentations to YouTube

Want to publish your Powerpoint PPT slideshows on Google Video or Youtube ? Or watch them without a computer on an iPod, mobile phones or your large TV screen using a DVD Player ?

Get PPTmovie, a conversion software that turns PowerPoint slides into movie formats like MP4, MPEG or AVI. The software will also record any background music or audio narrations through the microphone and sync it with the video slideshow.

Convert PPT to DVD, AVI or iPod
The tool costs around $50 but you can have it absolutely free today courtesy GiveAway website. [The free download link expires at 11:59 PM PST]

Download PPT Movie at GiveAway of the Day.

While PPT Movie will help you burn those PPT slideshows on a DVD disc or publish them on the video sharing websites that accept AVI, you may consider SlideShare for embedding Powerpoint slides as Flash in webpages.

Create a Movie of your Powerpoint Presentations with PPT To Video Scout


convert ppt to video aviPPT To Video Scout is a Windows-only software to convert Powerpoint PPT presentations into AVI or MPEG Video files which you can later burn to a DVD or a VCD.

Though PPT To Video Scout is a commercial software, you can get it absolutely free (no strings attached) as part of the "Giveaway of the Day" project.

To convert your PPT slides into video, you will need to have a copy of Microsoft Powerpoint installed on your machine since the software can only run from the "Convert To AVI" command in Powerpoint File menu. No stand-alone version.


Upload Flickr Picture Slideshows on YouTube Video

Though there exists a decent hack to create Flickr slideshows and embed them inside any website, here's a much better solution called SlideRoll that's easy and fun to work with.

Slideroll is like a web-based clone of Microsoft Photostory software - it lets you create slideshows of digital photographs that are your hard-drive or can fetch pictures directly from your Flickr account.


The advantage of using SlideRoll is that you can also add free music loops, transition effects and text titles to your Flickr slideshows and make them more appealing.

Slideroll provides a small HTML snippet to embed the Flickr slideshow in your Myspace webpage or any other blog.

Alternatively, you can download Flickr slideshows to your hard drive as MPEG Video using the free Slideroll Videomaker application and later upload them directly to Youtube.

Slideroll | VideoMaker [Flickr Slideshows for MySpace or YouTube].

How to Burn YouTube Videos on a DVD

Download Youtube, Burn DVDHow to create a DVD movie of video downloaded from Google Video, Youtube or Myspace so that these videos can be watched on the TV screen ?

That's exactly the requirement of Sarah Chamma. She writes:
I'm trying to figure out how to burn YouTube videos on DVDs (not CDs). Could you please give it to me step by step, clear as crystal?

What systems to use, how to burn more than one video on one DVD, etc.? I don't consider myself terribly computer literate.
Before you decide to watch Youtube videos on TV via your DVD player, keep in mind that the video quality will be very low - The video resolution on sites like youtube or Google Video is 320x240 while DVD frame size is 720x480 for NTSC or 720x576 for PAL.

If you are still game, here's how you can burn one or more video onto a DVD without spending a penny:

Step 1: Download the Internet Video to your hard disk in Flash Video format (extension: flv) using any of the free tools like iTube, vixy.net or keepVid.com.

Step 2: Get the free DVD authoring software called DVD Flick. The software takes all your videos, encodes them and burns a DVD that can be played on any DVD player. Follow this step-by-step guide on how to burn videos using DVD Flick.

With DVD Flick, you can also add Titles, subtitles and audio tracks to your Youtube DVD project to make them more interesting. Keep your Blank DVD disc ready.

Update: Sarah was finally able to transfer Youtube videos to Youtube. She writes - "Wow! Thanks a million. I did it! I'm so proud of myself. I can't thank you enough for that."

The Easiest Way to Save YouTube Videos


Kiss YouTube offers an innovative approach for downloading video clips from Youtube. No browser bookmarklets, no software to install, just remember the KISS "Keep It Sweet & Simple" principle.

While you are watching a video clip on the youtube website, just add the word "kiss" to the video URL in your browser address bar and hit enter. The video is ready to be saved on your computer in FLV format.

For instance, if the Youtube URI is something like youtube.com/watch?v=ls1954aa, you can download the clip by adding the word "kiss" in front of the youtube.com domain name. Hence the final address becomes kissyoutube.com/watch?v=ls1954aa which will have the link to save that clip.

KissYoutube.com